 |
There are several way to design a FirstMagic website:
- Install a ready-made Theme from the built-in Theme Library. There is a wide selection to browse, and installing a new theme just takes one click.
- Use the Theme Designer to make a custom theme. It´s easy - just pick the colors and fonts you like, and perhaps tweak some layout options. It is all point-and-click, with live preview: open any page to see what your changes looks like in realtime.
- Write a custom theme by hand. This requires familiarity with CSS, which is the standard design language for the web.
These methods can be combined: for example, you could create a theme with the Designer tool, then tweak it further in CSS.
To get started, open the Theme Designer from your Account Panel [click the Paint Roller icon].
SELECT A DESIGN MODE
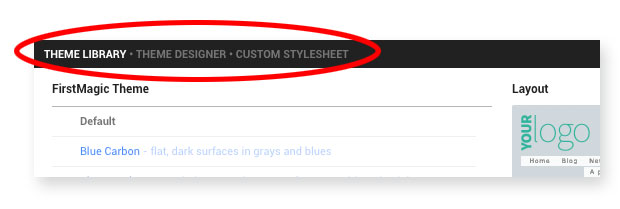
By default, the Designer Panel is set to the Library, meaning you can browse and install a new theme right away. To switch to a different mode, click one in the Designer Header. The page will refresh, and when you open the Designer window again, the new mode will be active.
Design Modes Overview
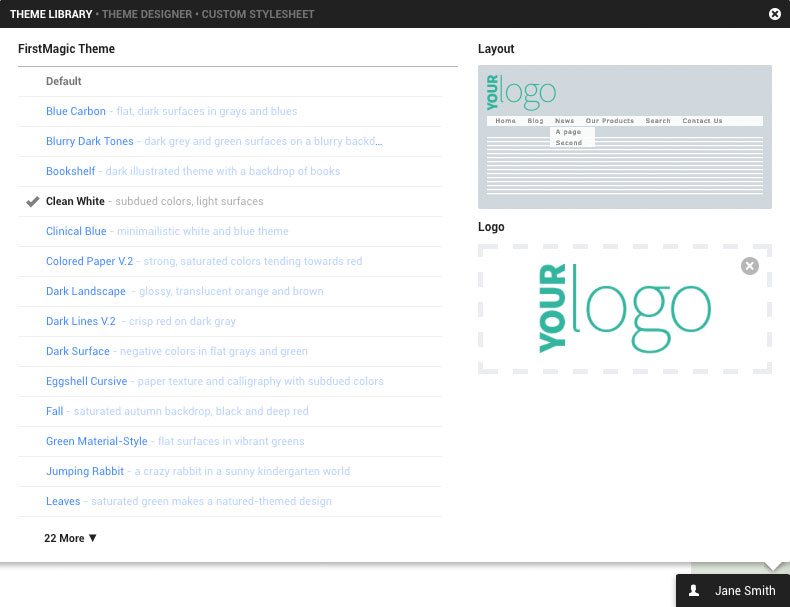
- Theme Library: browse the library by clicking on themes in the list. The website will display your chosen theme immediately.
- Theme Designer: you can design your site simply by clicking on fonts, colors, backgrounds and styles. It's an easy and intuitive way of building a custom design without coding. Any changes you do takes effect on the site immediately.
- Custom Stylesheet: this option will display the path to an active stylesheet, with buttons to quickly open and edit.
Note that both the Theme Library and the Theme Designer have an Export button; clicking it will export your chosen theme to a stylesheet, and switch the Designer tool to the Custom Stylesheet pane for you. FirstMagic will remember which theme you started out with: to return to it, simply select the Design Mode you previously used.
THE THEME LIBRARY
FirstMagic comes with a selection of ready-to-use Design Themes pre-installed. To select one, just browse the list until you find one you like.
If you want to tinker with your chosen theme, you can click the Export button: this will load it into the CSS Editor and switch the Design Mode to Custom Stylesheet.
Layout box: click around in this box to define the appearance of your pages.
- Click on the logo to align it
- Click on the Top Menu to turn it on / off
- Click on the content area to define or remove a Sidebar
Logo box: drag-and-drop your own logo into this box, and it will be installed in your site immediately.
THE THEME DESIGNER
Point-and-Click to create your website design. Changes takes effect on the site right away. If you wish to do more extensive customization, click Export to move your design to a Custom Stylesheet (FirstMagic will remember your original setting, so you can always go back).
- Color Theme: select a Base Color and an Accent Color for the theme
- Transparent: set transparency for the background color
- Scope: how extensively the Accent Color will be applied
- Fonts: choose a title and body font family, set text sizes, styles and weights
- Bells and Whistles: options for customizing the look and feel of the layout itself
Layout box: click around in this box to define the appearance of your pages.
- Click on the logo to align it
- Click on the Top Menu to turn it on / off
- Click on the content area to define or remove a Sidebar
Logo box: drag-and-drop your own logo into this box, and it will be installed in your site.
Background box: drag-and-drop a background image for your site into this box. Click the X to remove it, or to choose a pre-installed background image.
CUSTOM STYLESHEET
If you export a theme from the Theme Designer, it will appear here in the Custom Stylesheet Panel. To access it, click on one of the three buttons:
- The dark Edit CSS button will open the stylesheet directly, using the FC Client [free download for Windows, OSX or Linux].
- The dark Interesting button will open the Library itself, using the FC Client.
- The light Interesting button will open a WebDAV login to the Library.
The URL for a webDav connection would be http[s]://mydomain.com/Login/mydomain.com/library/
Note the capitalized L in /Login - the path is case sensitive. Substitute http for ftp, to login via FTP instead.
You can edit the stylesheet with any software you prefer - but the original file is a FC text document; if your software cannot read/write FC documents, just create a new file and copy the contents.
The stylesheet can be hosted anywhere on the internet - simply overwrite the Custom Stylesheet URL in the Designer Panel to host it elsewhere.
Tip: the Starter Kit Theme in the Theme Library is a simple, thoroughly commented example theme. It´s a boilerplate for developing your own theme, and the easiest way to start.
A LIST OF USEFUL CSS CLASSES
|
|
Structure
|
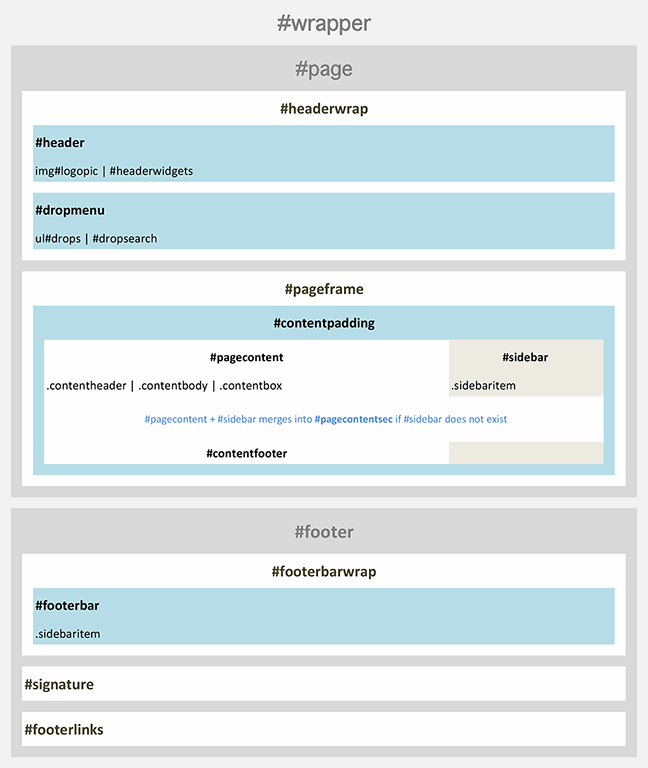
#wrapper
|
Wrapper div for everything in body
|
#page
|
Wrapper div for everything in body #wrapper except for #footer
|
#headerwrap
|
Wrapper div for the logo, header widgets and Top Menu: use #header to target only the logo and widgets, or #headercontent to target the inline block. Note: it may sometimes be useful to target #header differently when #dropmenu do not exist - use the body.nomenu prefix.
|
#dropmenu
|
The Top Menu wrapper. Use #dropmenu ul to access the actual menu, #dropsearch to access the menu Search Widget, and #dropmenu #dropxtra to access drop-downs.
|
#pageframe
|
Wrapper div for #pagecontent, #sidebar, .contentfooter. The #pageframe div is special: it knows if #sidebar floats left, right, or is trailing the body, and will position any background image accordingly [left | center | right].
|
#pagecontent
|
Contentarea wrapper if the site has #sidebar float. If #sidebar is #footerbar [trailing the body], use #pagecontentsec instead.
|
#sidebar
|
Sidebar content wrapper: prefix when the Sidebar floats left or right. Can be suffixed like so: #sidebar.sidebarleft and #sidebar.sidebarright.
|
#footerbar
|
Sidebar content wrapper: prefix when the Sidebar trails the body [always for mobile devices].
|
#footer
|
The page footer outside #pageframe, outside #page, inside #wrapper |
#footerbarwrap
|
Footer content wrapper: contains #footerbar.
|
Inner content - divs
|
#headerticker
|
The Newsticker Widget
|
.contentheader
|
H1 and .date wrapper
|
.contentbody
|
Inline contentwrapper [wraps all content generated by a WYSIWYG editor]
|
.contentbodylots
|
Inline contentwrapper if multiple WYSIWYG elements are present [like in Tiles or Gallery Layouts].
|
.contentbox
|
Wrapper for smaller inline objects [like Tiles, Condensed Blog entries, singular Calendar events]. Target Digital Signage boxes with .contentbox.timebox and .contentbox.event to differentiate between event elements.
|
.contentfooter
|
Footer widgets wrapper inside #pageframe
|
Note: .contentheader, .contentbody, .contentbox and .contentfooter should have identical margin-left and margin-right values to do perfect alignments.
|
.odd, .even
|
To alternate list items in directory views
|
.fctable
|
In XHTML: Generated old-style table that surrounds .fctext [wysiwyg] output. This is a legacy tag from old XHTML website setups. In modern setups, this tag will usually be a DIV, not a table.
In HTML5: wrapper div for inline text.
|
.paragraph
|
In XHTML: generated div that surrounds .fctext output [inside table.fctable tr td]. Legacy tag.
In HTML5: not in use.
|
.sidebaritem
|
Wrapper for items in #Sidebar and #footerbar [contains H2 + .fctable ]
|
Inner content - fonts
|
H1
|
Page titles. Can be suffixed with h1.maintitle to target the sticky title in blog views.
|
.date
|
Header metadata in documents [in contentheader: Date and Byline below H1]
|
H2
|
Sidebar titles, large contentbox titles [in major inline elements]
|
H3
|
Inline subtitles - very rarely used
|
#dropmenu a.toplink
|
Top-level links in the Menu: equivalent of #dropmenu ul li a
|
#dropmenu a.droplink
|
Second-level links in the Menu: equivalent of #dropmenu ul li ul li a
|
#dropmenu .current a
|
Active link in the Top Menu [.current a.droplink for singling out second-level]
|
H4, h4.fctext
|
Inline small-item box titles [like Tile titles and sub-titles in Widgets]
|
a.sidebarlink
|
Sidebaritem menu link [listing container link if in #sidebar]. Target with .fctext a.sidebarlink for block access
|
.fctext
|
In XHTML: Generated font declaration: fonts, sizes, colors and styles of editable body. Will default to Lucida Grande 13/16 if undefined, and is disregarded in the Freestyle template.
Note: For consistency, the .fctext class is also used on similar, non-generated elements [like previews in Tiles, Condensed Blog entries, form labels etc.], both in XHTML and HTML5. It is not in use in HTML5 for inline text; instead, the .wswrap class is used here.
|
.wswrap *
|
Open Text Web Clients will disregard CSS font formatting in generated content [family, size and color]. To overcome this, we can use .wswrap * !important to override body text produced by such a web clients. it is basically a global .fctext tag.
The .fcwrap tag can be used in place of .wswrap to address the same content without resorting to the important declaration.
|
.smallfctext
|
Div that Inherits from .fctext, for smaller details [like inline timestamps, singular monthly calendar events, etc.]
|
.fcquote |
In XHTML: Generated Quote class [class attached to any text using the generated quoted style used by some intranet client softwares].
In HTML5: not in use. Instead, we simply use <blockquote>.
Note: very useful for creating exceptions to the .fctext class. For example, a .fcquote .fctext can be used to create buttons out of WYSIWYG generated links.
|
.todaydate
|
In calendars overviews: class to single out Today |
#signature
|
Footer signature text [#footer #signature]. Useful to separate from #footer.
|
Forms elements
|
.label [.fctext.label]
|
Input Labels
|
.txtfield [input.txtfield]
|
Input + textarea.
|
.formbtn
|
button, submit class
|
.searchsubmit
|
Search Widget submit button [formatted as graphic element]
|
Forms iframe elements
|
.commentbody
|
<body> class for iframe in Commenting Widget
|
.messagebody
|
<body> class for iframe in template forms [pages that are forms]
|
.minibox
|
#sidebar iframe class [iframe.minibox]
|
.fullbox
|
#pagecontent iframe class
|
Tweaks
|
body
|
Body can be addressed with a class to differentiate between UIs: body.website and body.digitalsign. There's also body.mobilesite, which is obsolete and supports old-style Mobile UIs [modern websites are responsive and will not need it]
|
All website elements can be targeted by Layout by adding classes to #wrapper: the class name will be the Layout name:
|
#wrapper.blogdir
|
Blog
|
#wrapper.newsdir
|
Condensed Blog [Newspaper Layout] + Daily Calendar View
|
#wrapper.tilesdir
|
Tiles
|
#wrapper.listingdir
|
Listing Container Layout
|
#wrapper.gallerydir
|
Gallery Layout
|
#wrapper.tabsdir
|
Tabs [Resources Layout]
|
#wrapper.webshopdir
|
The Webstore layout
|
#wrapper.webpage
|
All document template types
|
#wrapper.calendarmonth
|
Monthly Calendar View
|
All website elements can be targeted differently depending on if the site has a Top Menu or not by adding a class to body:
|
body
|
No distinction
|
body.nomenu
|
Any element if the Top Menu does not exist [can be useful to reposition #header]
|
The #pageframe div is special: it knows if #sidebar floats left, right or do not exist, and will position any background image accordingly [left | center | right].
|
#pageframe
|
{background-image:(whatever)} ... With no positioning declaration allows you to attach an Y-tiling backdrop that is wider than the page: the visible portion will always follow the #sidebar div around...
|
#contentpadding
|
inline wrapper, immediately inside #pageframe.
|
#sidebar.sidebarleft #sidebar.sidebarright
|
To differentiate Sidebarpositions. Useful for creating custom margins and paddings.
|
Map
|
|
Help! Why are the CSS code in the themes so complex?
The built-in themes are not merely stylesheets; they are extensive Design Themes, built to work with any possible configuration of the Theme Designer. If you are looking to build a custom design, you won´t need a fraction of the code they contain - coding a custom design will be very simple in comparison. Look at the Starter Kit Theme - it has everything you need in just a few lines of annotated, easy to read CSS, included specificially for this purpose.
More developer resources
You can customize your site to any degree - there are no design limitations when writing CSS for FirstMagic.
For example, one can port a WordPress theme into a FirstMagic theme - it is just a matter of replacing CSS class names and tweaking their values where necessary. If any extra functionality is needed for support, the /Library/ include files in your site can be used to include third-party html and Javascript.
Note that Library Includes are invisible from the Web Interface: you need to login with a client or via webdav to see them. There are several such includes:
- metadata.inc: inject code in the website header
- beforecontent.inc: inject code right after <body> start
- aftercontent.inc: inject code right before </body> end
- terms.inc: labels and language-specific terms for the website.
- appterms.inc: labels and language-specific terms for the Today WebApp. This is also where you can add your own metatags to the app, for example if you want to give it an unique Splash Screen, or need to define extra icon sizes to support older devices.
Additionally, two more files are useful for developing a custom WebApp, or for reconfiguring the built-in default:
- apptheme.css: to style your WebApp.
- manifest.json: for more advanced configuration of the WebApp.
If you log in with an intranet client, shift-click the directory arrow in the Navigator Pane for /login/yourwebsite.com/library/ to display these items. If you are unfamiliar with this interface, the Administrator can provide instructions, and you will also get help at http://support.firstmagic.net.
Javascript libraries
MooTools is built into FirstMagic, and using it will make the footprint much smaller than if you were to include a second library. Though if you need it, jQuery is also built in, but not running by default; the Administrator can activate it for you. Using the built-in distribution will automatically cause JQuery to run in noconflict mode (escaping the dollar sign), so as not to interfere with Mootools.
|  |


